/

Features

Timeline

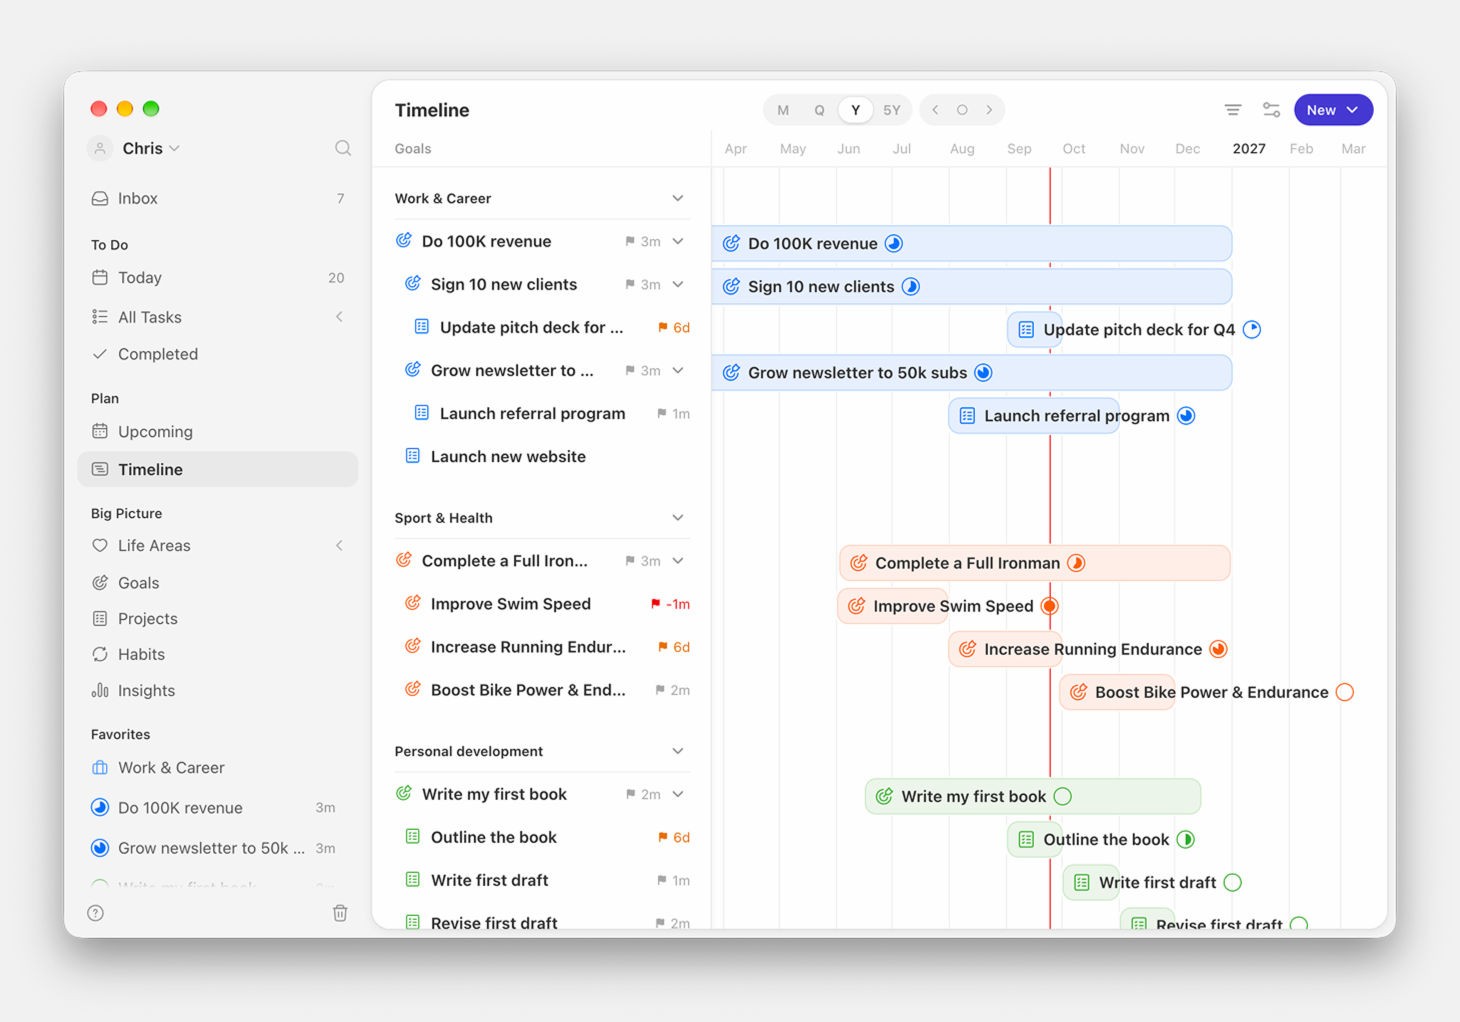
The Timeline lays your goals and subgoals out as bars across time, each one running from its start date to its deadline. Where the list on the Goals screen tells you what you're working towards, the timeline tells you when, and shows you the two things a list can't: what overlaps, and what you've quietly stacked into the same six weeks.

Think of it as your year seen sideways. Zoom out to five years for the long arc, or in to a month to see what's actually in front of you.

The timeline is the second view on the Goals screen, switched from the view-switcher icons in the top-right of the screen header.

Note: The Timeline is a premium feature. On a free plan the Goals screen shows the list view only.

Opening the Timeline

Go to Goals and press the second view-switcher icon in the top-right of the header. The first icon takes you back to the list.

The timeline is available on Desktop and iOS. The iOS layout is adapted for the smaller screen, but it's the same view with the same information.

Reading the Timeline

The screen splits in two.

On the left is a compact list of your goals showing each goal's name and how much time is left on it. Goals with a deadline behind them show it in red, so an overrun is visible without opening anything.

On the right is the timeline itself. Each goal is a bar spanning from its start date to its deadline, and a vertical line marks today, so where a bar sits relative to that line tells you whether you're ahead or behind.

Subgoals nest under the goal they belong to. Expand a goal in the left panel and its subgoals appear as their own bars, which is how you see whether the steps inside a goal are sequenced or all landing at once.

Goals without dates are listed as No dates and get no bar. A goal can't be placed on a timeline until it has a start date, a deadline, or both, so this is a quick way to spot the goals you've never scoped.

Changing the Time Range

Four zoom levels sit at the top of the timeline:

Level

Best for

M

The month in front of you

Q

A quarter, which matches how most planning cycles run

Y

The year, for seeing how goals distribute across it

5Y

Long-horizon goals and the multi-year picture

Next to them are three navigation controls: < steps back one period, > steps forward one, and the button between them jumps back to today.

Rescheduling by Dragging

Drag a bar along the timeline to change the goal's start date and deadline directly, without opening it. This is the fastest way to push a goal back a quarter when it's clear it isn't happening this one, and it's the main reason to plan here rather than in the list.

Grouping the Left Panel

The timeline uses the same three grouping modes as the Goals list, switched from the screen header:

Grouping

What you get

None

A flat list of every goal, so the bars read as one continuous picture of your commitments

Life area

Life areas as section headers, which is the default and the one to use for checking balance

Deadline

Goals bucketed into quarterly sections by when they're due, for a deadline-driven read across every life area

Grouping by deadline is the one worth trying during quarterly planning. It puts everything due in the same quarter next to each other, so an overloaded Q4 is obvious before you commit to it.

Narrowing What You See

The Filter control in the top-right narrows the timeline the same way it narrows the Goals list:

Filter

What it does

Life areas

Show only goals in the life areas you pick

Active goals

Show only goals that have started and haven't passed their deadline

Goal impact

Show only High, Medium, or Low impact goals

Start date

Narrow by when goals begin

Deadline

Narrow by when goals are due

Filtering to high-impact goals is a quick way to check whether your most important work has room to breathe or is stacked on top of itself.

The filter is remembered between visits, so the view you set up is the one you come back to.

+ Add goal sits alongside it, so you can create a goal without leaving the timeline.

Timeline or Roadmap?

Griply has two views that lay goals out visually, and they answer different questions:

  • The Timeline, on the Goals screen, covers every goal across your whole account, so you use it to see how your commitments distribute over time.

  • The Roadmap tab, inside a single goal, covers the subgoals of that one goal. See Goals.

Reach for the timeline when you're planning your year, and the Roadmap when you're breaking down one goal.

Best Practices

  • Check the quarter view during planning โ†’ It shows overcommitment more honestly than a list does.

  • Give every goal a deadline โ†’ A goal with no dates never appears on the timeline, so it drops out of the picture you plan against.

  • Filter to high impact โ†’ If your most important goals are all in the same six weeks, something has to move.

  • Drag rather than retype โ†’ Pushing a bar is faster than opening a goal to edit two dates.

  • Zoom out once a quarter โ†’ The 5Y view is where multi-year goals stop feeling abstract. See Yearly, Quarterly & Monthly Planning.

Didnโ€™t find what you were looking for? Weโ€™re here to help! You can contact us anytime or ask your question in one of our communities.

/

Features

Timeline

The Timeline lays your goals and subgoals out as bars across time, each one running from its start date to its deadline. Where the list on the Goals screen tells you what you're working towards, the timeline tells you when, and shows you the two things a list can't: what overlaps, and what you've quietly stacked into the same six weeks.

Think of it as your year seen sideways. Zoom out to five years for the long arc, or in to a month to see what's actually in front of you.

The timeline is the second view on the Goals screen, switched from the view-switcher icons in the top-right of the screen header.

Note: The Timeline is a premium feature. On a free plan the Goals screen shows the list view only.

Opening the Timeline

Go to Goals and press the second view-switcher icon in the top-right of the header. The first icon takes you back to the list.

The timeline is available on Desktop and iOS. The iOS layout is adapted for the smaller screen, but it's the same view with the same information.

Reading the Timeline

The screen splits in two.

On the left is a compact list of your goals showing each goal's name and how much time is left on it. Goals with a deadline behind them show it in red, so an overrun is visible without opening anything.

On the right is the timeline itself. Each goal is a bar spanning from its start date to its deadline, and a vertical line marks today, so where a bar sits relative to that line tells you whether you're ahead or behind.

Subgoals nest under the goal they belong to. Expand a goal in the left panel and its subgoals appear as their own bars, which is how you see whether the steps inside a goal are sequenced or all landing at once.

Goals without dates are listed as No dates and get no bar. A goal can't be placed on a timeline until it has a start date, a deadline, or both, so this is a quick way to spot the goals you've never scoped.

Changing the Time Range

Four zoom levels sit at the top of the timeline:

Level

Best for

M

The month in front of you

Q

A quarter, which matches how most planning cycles run

Y

The year, for seeing how goals distribute across it

5Y

Long-horizon goals and the multi-year picture

Next to them are three navigation controls: < steps back one period, > steps forward one, and the button between them jumps back to today.

Rescheduling by Dragging

Drag a bar along the timeline to change the goal's start date and deadline directly, without opening it. This is the fastest way to push a goal back a quarter when it's clear it isn't happening this one, and it's the main reason to plan here rather than in the list.

Grouping the Left Panel

The timeline uses the same three grouping modes as the Goals list, switched from the screen header:

Grouping

What you get

None

A flat list of every goal, so the bars read as one continuous picture of your commitments

Life area

Life areas as section headers, which is the default and the one to use for checking balance

Deadline

Goals bucketed into quarterly sections by when they're due, for a deadline-driven read across every life area

Grouping by deadline is the one worth trying during quarterly planning. It puts everything due in the same quarter next to each other, so an overloaded Q4 is obvious before you commit to it.

Narrowing What You See

The Filter control in the top-right narrows the timeline the same way it narrows the Goals list:

Filter

What it does

Life areas

Show only goals in the life areas you pick

Active goals

Show only goals that have started and haven't passed their deadline

Goal impact

Show only High, Medium, or Low impact goals

Start date

Narrow by when goals begin

Deadline

Narrow by when goals are due

Filtering to high-impact goals is a quick way to check whether your most important work has room to breathe or is stacked on top of itself.

The filter is remembered between visits, so the view you set up is the one you come back to.

+ Add goal sits alongside it, so you can create a goal without leaving the timeline.

Timeline or Roadmap?

Griply has two views that lay goals out visually, and they answer different questions:

  • The Timeline, on the Goals screen, covers every goal across your whole account, so you use it to see how your commitments distribute over time.

  • The Roadmap tab, inside a single goal, covers the subgoals of that one goal. See Goals.

Reach for the timeline when you're planning your year, and the Roadmap when you're breaking down one goal.

Best Practices

  • Check the quarter view during planning โ†’ It shows overcommitment more honestly than a list does.

  • Give every goal a deadline โ†’ A goal with no dates never appears on the timeline, so it drops out of the picture you plan against.

  • Filter to high impact โ†’ If your most important goals are all in the same six weeks, something has to move.

  • Drag rather than retype โ†’ Pushing a bar is faster than opening a goal to edit two dates.

  • Zoom out once a quarter โ†’ The 5Y view is where multi-year goals stop feeling abstract. See Yearly, Quarterly & Monthly Planning.

Didnโ€™t find what you were looking for? Weโ€™re here to help! You can contact us anytime or ask your question in one of our communities.

/

Features

Timeline

The Timeline lays your goals and subgoals out as bars across time, each one running from its start date to its deadline. Where the list on the Goals screen tells you what you're working towards, the timeline tells you when, and shows you the two things a list can't: what overlaps, and what you've quietly stacked into the same six weeks.

Think of it as your year seen sideways. Zoom out to five years for the long arc, or in to a month to see what's actually in front of you.

The timeline is the second view on the Goals screen, switched from the view-switcher icons in the top-right of the screen header.

Note: The Timeline is a premium feature. On a free plan the Goals screen shows the list view only.

Opening the Timeline

Go to Goals and press the second view-switcher icon in the top-right of the header. The first icon takes you back to the list.

The timeline is available on Desktop and iOS. The iOS layout is adapted for the smaller screen, but it's the same view with the same information.

Reading the Timeline

The screen splits in two.

On the left is a compact list of your goals showing each goal's name and how much time is left on it. Goals with a deadline behind them show it in red, so an overrun is visible without opening anything.

On the right is the timeline itself. Each goal is a bar spanning from its start date to its deadline, and a vertical line marks today, so where a bar sits relative to that line tells you whether you're ahead or behind.

Subgoals nest under the goal they belong to. Expand a goal in the left panel and its subgoals appear as their own bars, which is how you see whether the steps inside a goal are sequenced or all landing at once.

Goals without dates are listed as No dates and get no bar. A goal can't be placed on a timeline until it has a start date, a deadline, or both, so this is a quick way to spot the goals you've never scoped.

Changing the Time Range

Four zoom levels sit at the top of the timeline:

Level

Best for

M

The month in front of you

Q

A quarter, which matches how most planning cycles run

Y

The year, for seeing how goals distribute across it

5Y

Long-horizon goals and the multi-year picture

Next to them are three navigation controls: < steps back one period, > steps forward one, and the button between them jumps back to today.

Rescheduling by Dragging

Drag a bar along the timeline to change the goal's start date and deadline directly, without opening it. This is the fastest way to push a goal back a quarter when it's clear it isn't happening this one, and it's the main reason to plan here rather than in the list.

Grouping the Left Panel

The timeline uses the same three grouping modes as the Goals list, switched from the screen header:

Grouping

What you get

None

A flat list of every goal, so the bars read as one continuous picture of your commitments

Life area

Life areas as section headers, which is the default and the one to use for checking balance

Deadline

Goals bucketed into quarterly sections by when they're due, for a deadline-driven read across every life area

Grouping by deadline is the one worth trying during quarterly planning. It puts everything due in the same quarter next to each other, so an overloaded Q4 is obvious before you commit to it.

Narrowing What You See

The Filter control in the top-right narrows the timeline the same way it narrows the Goals list:

Filter

What it does

Life areas

Show only goals in the life areas you pick

Active goals

Show only goals that have started and haven't passed their deadline

Goal impact

Show only High, Medium, or Low impact goals

Start date

Narrow by when goals begin

Deadline

Narrow by when goals are due

Filtering to high-impact goals is a quick way to check whether your most important work has room to breathe or is stacked on top of itself.

The filter is remembered between visits, so the view you set up is the one you come back to.

+ Add goal sits alongside it, so you can create a goal without leaving the timeline.

Timeline or Roadmap?

Griply has two views that lay goals out visually, and they answer different questions:

  • The Timeline, on the Goals screen, covers every goal across your whole account, so you use it to see how your commitments distribute over time.

  • The Roadmap tab, inside a single goal, covers the subgoals of that one goal. See Goals.

Reach for the timeline when you're planning your year, and the Roadmap when you're breaking down one goal.

Best Practices

  • Check the quarter view during planning โ†’ It shows overcommitment more honestly than a list does.

  • Give every goal a deadline โ†’ A goal with no dates never appears on the timeline, so it drops out of the picture you plan against.

  • Filter to high impact โ†’ If your most important goals are all in the same six weeks, something has to move.

  • Drag rather than retype โ†’ Pushing a bar is faster than opening a goal to edit two dates.

  • Zoom out once a quarter โ†’ The 5Y view is where multi-year goals stop feeling abstract. See Yearly, Quarterly & Monthly Planning.

Didnโ€™t find what you were looking for? Weโ€™re here to help! You can contact us anytime or ask your question in one of our communities.

Table of contents